


Despite plenty of piped and frosted details, this vintage heart cake is easier to assemble than it looks. You don't even need a heart-shaped pan!

Vintage Heart Cake

Updated on Jan. 23, 2025
What’s old is new again, and the same applies to cake designs. Vintage cakes are a popular option for any occasion, but this recipe takes it one step further and transforms a simple round layer cake into a vintage heart cake with plenty of intricate details, including shell borders, ruffles, dainty dots and any other design elements you like.
Vintage frosting styles allow you to stretch your creativity to produce a beautiful cake for any occasion. You can use the recipe below or turn to any other cake recipe that produces two round layers, whether you like chocolate cake, red velvet cake or even funfetti cake. Bake, assemble and frost this treat as a Valentine’s Day cake, a birthday cake, or get creative for an upcoming anniversary or Mother’s Day.
Vintage Heart Cake Buttercream
This vintage heart-shaped cake requires a lot of frosting since you need it for the assembly of the layer cake, the crumb coating, the top layer, and all the intricately piped borders and details on top of that. The best type of frosting to use is a classic American buttercream frosting recipe made with butter, confectioners’ sugar, vanilla and milk. The key is to avoid frosting that is too soft or too stiff, and buttercream frosting provides both a smooth, pipeable texture and stability. In total, you’ll need about 10 cups of buttercream frosting, so it’s best to make plenty. You can always freeze any leftover frosting for your next baking project.
Vintage Heart Cake Ingredients
- Butter: Unsalted butter serves as the structural base for both the cake layers and the buttercream frosting. It also adds flavor. Be sure to start with softened butter so it incorporates into the batter and the frosting more easily.
- Sugar: Granulated sugar is the key to a light and fluffy cake. It’s creamed with softened butter to provide aeration. The creamed butter and sugar create the proper texture for the cake batter while also adding sweetness.
- Eggs and additional egg whites: Two whole eggs and two egg whites are incorporated into this cake. The eggs help make the cake rise, while the yolks specifically enhance the flavor. Here’s how to separate egg whites from yolks.
- Vanilla extract: A small amount of vanilla extract goes a long way in enhancing the flavor of this decorated heart-shape vintage cake. Vanilla is a flavor base for both the cake layers and the frosting, so consider splurging on one of the best vanilla extracts.
- All-purpose flour: Flour is a key building block for cake baking as it provides structure in the batter.
- Baking powder and baking soda: Baking powder and baking soda are leavening agents that help the cake rise and give it a fluffy texture. Test your baking powder and baking soda to see if they’re still fresh before adding them to the batter.
- Salt: Just a touch of salt helps balance the sweetness and flavor of the cake.
- Milk: Liquid is important in a cake batter for moisture, and milk in particular serves as a flavorful option. We use 2% milk, but you can swap in whole milk.
- Sour cream: A small amount of sour cream can make a big impact in providing moisture for the cake.
- Confectioners’ sugar: Buttercream frosting is made from a base of butter and confectioners’ sugar. The sugar sweetens the frosting and helps thicken it for structure.
Directions
Step 1: Cream the butter and sugar
Preheat the oven to 350°F. In a stand mixer fitted with the paddle attachment, beat the softened butter and sugar on medium speed until soft and fluffy, three to four minutes. Beat in the eggs and egg whites, then add the vanilla extract. Beat for another one to two minutes until fluffy.
Step 2: Add the dry ingredients
In a large bowl, whisk together the flour, baking powder, baking soda and salt. Add half the flour mixture and half the milk to the butter mixture, beating on low speed. Repeat with the remaining flour mixture and milk until incorporated. Then, mix in the sour cream on low speed.
Editor’s Tip: The key to preventing the common cake mistake of producing a dry cake is to avoid overmixing the batter. Mix the batter until the wet and dry ingredients are just combined.
Step 3: Bake the cakes

Place a round piece of parchment in the bottom of two 8-inch round cake pans and coat with cooking spray. Evenly divide the batter between the two cake pans. Bake the cakes for 23 to 25 minutes or until a toothpick inserted into the center comes out clean. Allow the cakes to cool in the pans for 10 minutes before transferring to a wire rack to cool completely.
Step 4: Make the frosting

In a large bowl, beat the softened butter until soft and fluffy, one to two minutes. Beat in 2 cups confectioners’ sugar, the milk and the vanilla extract on low speed. Gradually add the remaining confectioners’ sugar and beat the frosting until smooth.
Step 5: Cut the heart shapes

Place one cooled cake layer on a cutting board. At the bottom middle of the circle, make two slices to create the pointed bottom of the heart. Set the two leftover pieces aside to make the rounded top of the heart. Repeat with the second layer.
Editor’s Tip: Level your cakes if needed before cutting the heart-shaped pieces. A serrated cake knife is a great tool for the job.
Step 6: Assemble the cake
Place one of the larger pointed cake layers on a cake stand or plate. Use the buttercream frosting to attach the rounded tops. The frosting will act as a glue to keep them in place. Spread buttercream frosting over the top and repeat with the second layer. Spread a thin layer of frosting over the cake to create a crumb coat. If desired, you can trim parts of the cake at this point to emphasize its shape, applying frosting after any additional cuts. Chill the cake for 30 minutes.
Editor’s Tip: When attaching the rounded tops to the heart, use your hands and lightly press to keep them in place for 20 seconds. This will help the frosting adhere better.
Step 7: Frost and decorate the cake
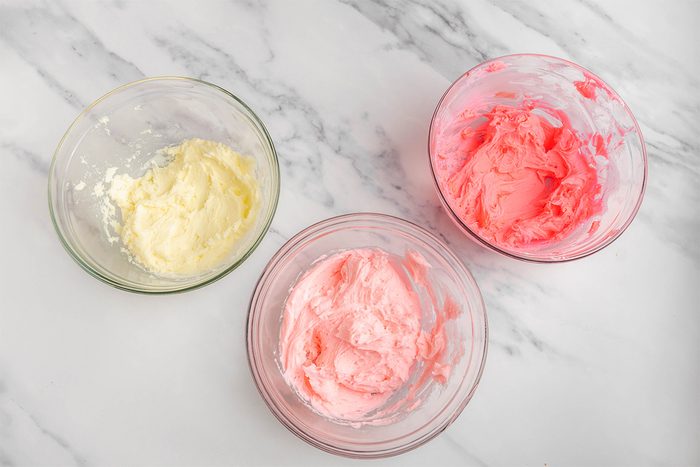
Transfer half the remaining frosting to two bowls, and add food coloring to each as desired.

Spread half of the frosting on the entire cake and smooth with a spatula.

Use piping bags to pipe the colored frosting onto the top and bottom borders on the cake. Add additional piped details such as ribbons or dots if desired. Slice and serve.

Vintage Heart Cake Variations
- Play with other color combinations: We love the combination of light pink and white, with a pop of deeper pink for contrast. However, the colors are all up to you! Play with additional shades of pink, or choose another color altogether. This cake can be customized to match any color scheme.
- Add writing: The top of the cake is the perfect spot to add a note. Use a round piping tip to write on the cake. “I love you” or “Happy Birthday!” are both great options depending on the occasion.
- Dress up with fruit: Want to dress up this cake even further? Fresh fruit is a great option. Consider adding cherries with stems on top, sliced or whole strawberries, or raspberries.
- Match to any occasion: While this pink vintage heart cake serves as a great Valentine’s Day dessert, the possibilities of when to serve it are endless. Switch up the color palette and make it for everything from birthday parties and anniversaries to baby showers.
How to Store a Vintage Heart Cake
A vintage heart cake should be stored just like any other type of cake. Any leftover slices should be kept in an airtight container or wrapped in storage wrap.
How long does a heart cake last?
Keep the wrapped cake at room temperature for up to three days or in the fridge for up to five days. You can also freeze cake leftovers for up to two months. Wrap the cake in storage wrap, and then place it in a freezer bag or wrap it in aluminum foil.
How can you make a vintage heart cake in advance?
The frosting of this cake takes the most time. Want to speed up the process? Have the cake layers baked and ready. You can bake and cool any two round cake layers and store them in the freezer for up to two months before assembling. Just be sure to wrap them in one layer of storage wrap and one layer of aluminum foil before storing them in the freezer. Allow the cakes to thaw in the fridge, make your frosting and get to decorating!
Vintage Heart Cake Tips

Can you bake a vintage heart-shaped cake in a heart pan?
Yes! You absolutely can use a heart-shaped cake pan for this pink vintage heart cake. Otherwise, you can certainly make the heart shape by cutting round cake layers.
Can you make a single-layer heart cake?
Don’t need as big of a cake? You can opt for just one layer instead. Cut the recipe in half and follow the same assembly method as directed for a smaller vintage heart-shaped cake.
How do you get a clean slice of cake?
The key to a nice, clean slice of cake is to start with a sharp serrated knife. For best results, wipe the knife clean with a kitchen towel after each slice. This is one of our best tricks for cutting a round cake like a pro.
What else can you serve with a heart-shape vintage cake?
Nothing beats the classic pairing of cake and ice cream. Another great topping? A drizzle of homemade raspberry sauce. A slice of this vintage heart cake also pairs well with a glass of champagne party punch for a special occasion.
Vintage Heart Cake
Prep Time
1 hour
Cook Time
30 min
Yield
16 pieces
Ingredients
- CAKE:
- 1/2 cup butter, softened
- 1-1/2 cups sugar
- 2 large eggs, room temperature
- 2 large egg whites, room temperature
- 1-1/2 teaspoons vanilla extract
- 2-1/4 cups all-purpose flour
- 1-1/2 teaspoons baking powder
- 1/2 teaspoon baking soda
- 1 teaspoon salt
- 1-1/2 cups 2% milk, room temperature
- 1/2 cup sour cream
- FROSTING:
- 2 cups unsalted butter (4 sticks), softened
- 12 cups confectioners' sugar, divided
- 1/2 cup 2% milk
- 4 teaspoons vanilla extract
- Food coloring
Directions
- Preheat oven to 350°. In a stand mixer fitted with the paddle attachment, beat butter and sugar on medium speed until soft and fluffy, 3-4 minutes. Add whole eggs, egg whites and vanilla extract; beat until fluffy, 1-2 minutes.
- In a large bowl, combine flour, baking powder, baking soda and salt. Add half of the flour mixture and half of the milk, beating on low speed; repeat with remaining flour mixture and milk until incorporated. Mix in sour cream on low speed.
- Place a piece of round parchment paper in two 8-in. cake pans; coat with cooking spray. Transfer batter evenly into each prepared pan. Bake 23-25 minutes or until a toothpick inserted into the center comes out clean. Allow cakes to cool completely.
- In a large bowl, beat butter until soft and fluffy, 1-2 minutes. Beat in 2 cups of powdered sugar, milk and vanilla extract on low speed. Gradually add the remaining powdered sugar, beating until smooth.
- Place one cooled cake layer on a cutting board. At the bottom middle part of the circle, make two cuts to create the pointed bottom of the heart. Set the two leftover pieces aside to make the rounded top of the heart. Repeat with the second layer.
- Place one of the larger pointed cake layers on a stand or plate. Use frosting to attach the rounded tops (this will act as a glue to keep them in place). Spread buttercream frosting over the top; repeat with the second layer. Spread a thin layer of frosting over the cake to create a crumb coat. If desired, trim parts of the cake to emphasize its shape, applying frosting after any additional cuts. Chill cake for 30 minutes.
- Transfer half of the remaining frosting to 2 bowls; add food coloring to each, as desired. Spread the other half of the frosting on the entire cake; smooth with a spatula. Use colored frosting to pipe top and bottom borders on the cake. Add additional piped details such as ribbons or dots, if desired. Slice; serve.
Nutrition Facts
1 piece.: 787 calories, 32g fat (19g saturated fat), 107mg cholesterol, 316mg sodium, 124g carbohydrate (109g sugars, 0 fiber), 5g protein.
Loading Popular in the Community
An elaborately decorated vintage heart cake is lovely for plenty of occasions, from Valentine's Day to birthdays to anniversaries. —Molly Allen, Hood River, Oregon
Recipe Creator
Loading Reviews